SWS (Seneye Web Server) Instructions (English)
- We have highlighted your search term load slide for you. If you'd like to remove the search term, click here.
Set Up Instructions
1) Take your slide out of the packaging and soak slide in the water you are going to monitor for 24 hours for freshwater tanks and 48 hours for saltwater tanks.
DO NOT SOAK YOUR SLIDE IN TAP WATER OR RO WATER
2) Set up your Seneye Web Server (SWS)
3) Connect your Seneye USB Device (SUD)
4) Insert and activate slide. Detailed instructions: Insert and Activate Slide
DO NOT CONNECT THE SWS TO THE WI-FI ADAPTOR UNTIL INSTRUCTED

Stage 1 - Click here to create a seneye.me account
Once you have created your account, please return to this page to continue setup.
Stage 2 - Click here to register your Seneye Web Server
PIN and ID on the sticker on the SWS packaging. An EXAMPLE of this is shown below:

Stage 3 - Connecting the SWS to your router
If you are using any products such as BT Parental Controls or SKY shield or other internet security services then the SWS may not be able to communicate with the seneye servers. Please click here for more information.
PLEASE DO NOT CONNECT YOUR Seneye USB Device (SUD) TO THE SWS YET
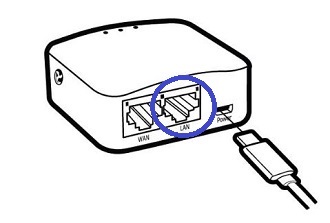
A. CONNECT YOUR SWS TO YOUR ROUTER VIA AN ETHERNET (You must do this before you connect your SWS to a wifi module)
1. Plug the Ethernet cable (supplied) into the purple port on your SWS
2. Then connect the other end of the cable directly to your router.

B. CONNECT POWER
1. Plug the USB power adaptor (supplied) into the mains.
2. Connect one end of the micro USB cable (supplied) into USB power adaptor.
3. Connect the other end into the micro USB port (black port) of the SWS.

Your SWS will now boot up:
When your SWS boots, the lights on the front will flash in the following sequence:

Stage 4 - Finding the SWS GUI (Graphic User Interface)
Open a web browser on a device that is on the same area network as your router, if you are running dual-band Wi-Fi you will need to be on the same band. If connecting on a mobile/cell phone, please ensure you have mobile/cellular data turned off.
Your URL was provided when you registered your SWS. It is made up of your ID an example is given below to show the format:
Find your SWS ID on the label on the front of the SWS. If you don't have this label anymore then it can be found by unclipping the back cover of the SWS.
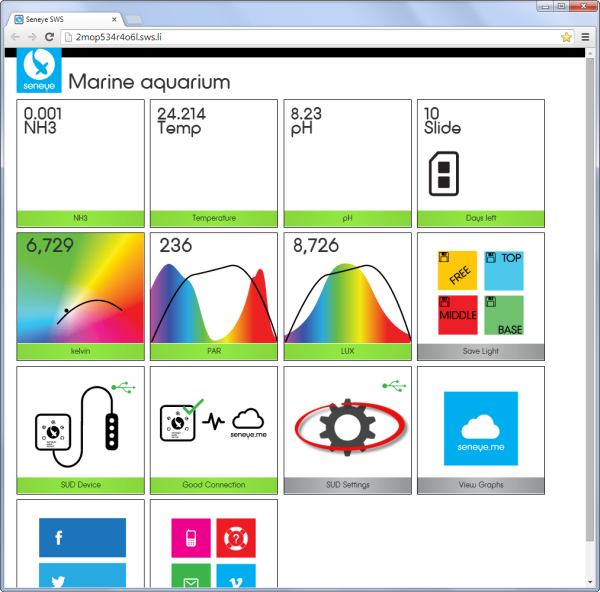
This is what your SWS GUI will look like, don't forget to bookmark it in your browser so you can access it easily!
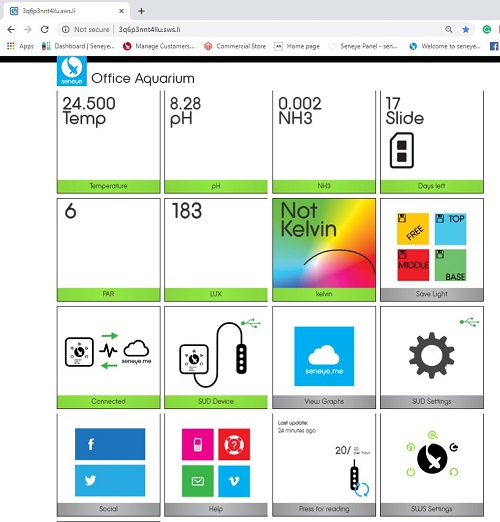
For more information on how to use your GUI follow this link: Seneye Web Server Graphic User Interface
If you cannot find your SWS GUI, then please contact us at [email protected]
Stage 5 - Connecting your Seneye USB Device
Connect your Seneye USB Device (SUD) directly to the SWS.
Do not use any form of extension leads as the SUD will not communicate correctly.
Please make sure you keep your SWS in a dry place, away from water and humidity. If you are unable to do this, please purchase our DRI box.
Stage 6 - Marine Tick (Saltwater tanks only)
If you are using your SUD in saltwater you will need to check the Marine Tick box for your SUD so that it can adjust pH readings accordingly.
Click on the SUD settings tile on your Web Server's GUI:
Then check the Marine Tick and press save:

Stage 7 - Fit and register your slide:Register your slide
Stage 8 - Setting up a WiFi module
If your SWS came with a WiFi adaptor module, you will need to set it this up.
CLICK HERE FOR WIFI MODULE SET UP INSTRUCTIONS
You may also find the following links useful to get the most from your new seneye device.