SWS (Seneye Web Server) Instructions (English)
DO NOT PLUG IN OR TURN ON YOUR SWS BEFORE READING THESE INSTRUCTIONS
Stage 1 - Registering an account on seneye.me
If you have not already done so, please register an account at www.seneye.me. You will need to use the E-mail address that you want your alerts sent too.
Once you have registered, please ignore any details on the Welcome E-mail that mentions downloading the seneye connect application. Seneye connect software is not needed because everything will be done using your SWS. Once your registration is complete, please continue through these instructions.
Stage 2 - Registering the SWS to your account
If you are a current seneye user and have a seneye USB device (SUD) registered to your account please ignore this step as the SWS will automatically link to your account. Please proceed to Stage 3 of the instructions
Please go to the following link to register your SWS to your account.
You will be asked for your E-mail address, password, and the details that are on the sticker on the SWS packaging. An example of this is shown below:
Please note that O is the letter O and not the number 0 in the ID

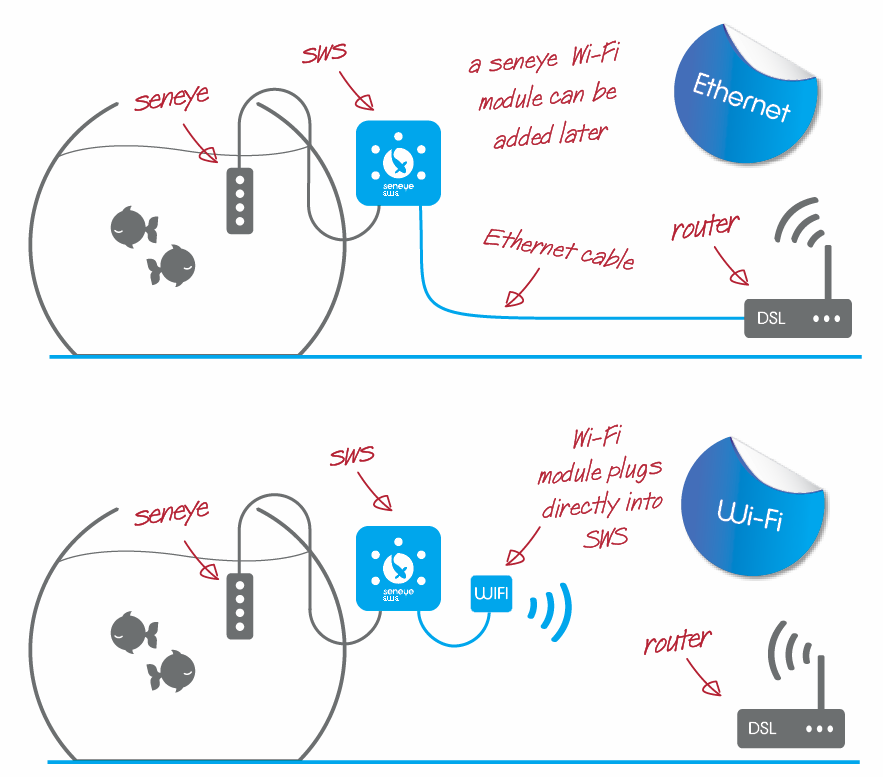
Stage 3 - Connecting the SWS to your Local Area Network
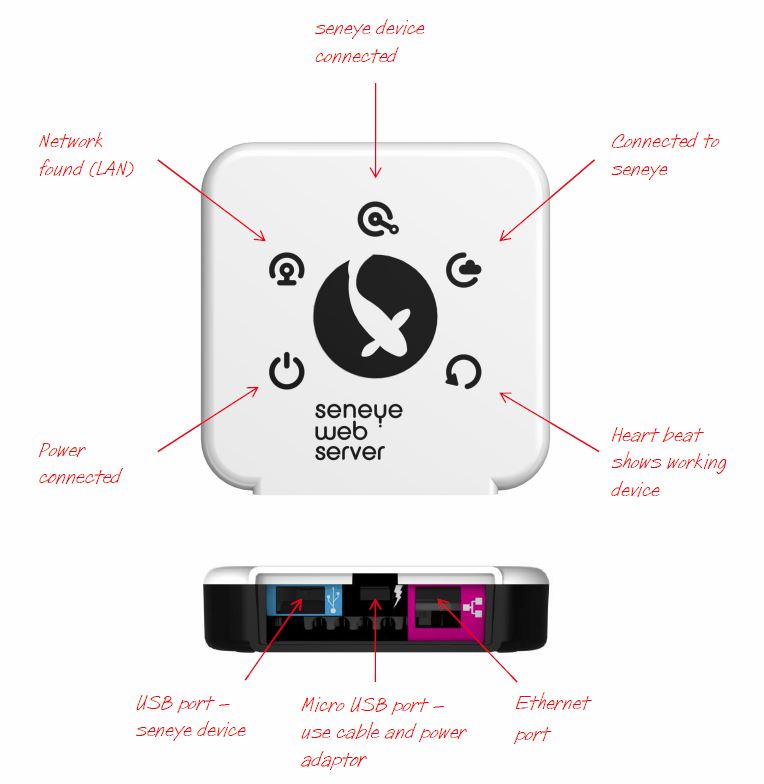
An overview of the lights and connections on the SWS can be seen below. You will need to reference these later in the setup.
In order to connect the SWS to your LAN, the following ports need connecting in the order described below.
At this stage it is very important not to connect your seneye device to the SWS.
If you are using a WiFi or Ethernet Over Power (EOP) adaptor, we suggest that you setup your SWS first by following the instructions below, and then setup the adaptor after. The Edimax instructions are here.
A. CONNECT ETHERNET
1. Connect the Ethernet cable supplied directly to your router.
2. Connect the Ethernet cable to your SWS (purple port).

B. CONNECT POWER
1. Plug the USB power adaptor (supplied) into the mains.
2. Connect the micro USB cable (supplied) into USB power supply.
3. Connect the micro USB cable into the Micro USB port (black port).

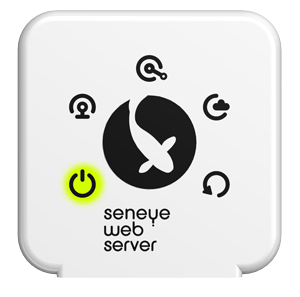
Your SWS will now boot up:
When you SWS boots, the lights on the front will flash in the following sequence:
If a firmware update for the SWS is available then it will start to download it automatically. The following light sequence will be shown.

Once downloaded it will show this light sequence while updating.
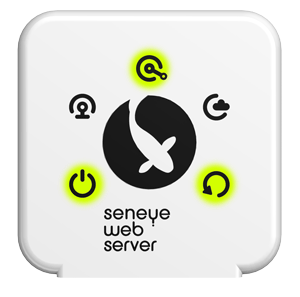
Please make sure that power and ethernet cables are kept connected during this period. After an update it will return to the status shown in the image shown at the top of this section.

Stage 4 - Find the SWS Graphic User Interface
You can view direct data from your SWS by using PC, tablet or mobile phone that is connected to same LAN as the SWS. We would recomend doing this using FireFox as a browser, this renders the GUI of the SWS best.
To find your SWS GUI please open up a browser on a device that is on your LAN. The following address needs to be entered the URL bar at the top of the browser. The URL is unique so your SWS and the part that is marked with **** on the address below needs to be replaced with the ID code that was on the label on the front of your SWS.
An example is given below to show the format
If you cannot find your SWS GUI, then please contact us at [email protected]
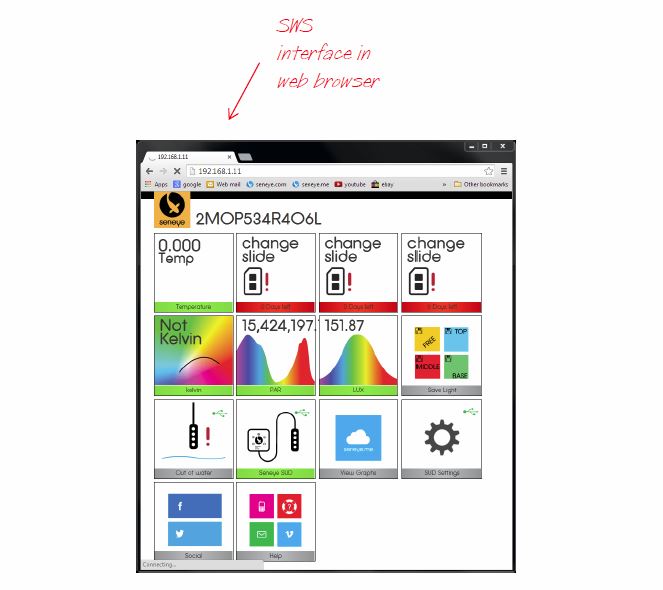
Stage 5 - Using the SWS GUI
Once you have found the SWS, you will find a page like that below. The page is dynamic and you can move the tiles. It will also resize to any device screen size.
Your SWS is now working. Don't forget to bookmark the page on your browser to access it easily.
Stage 6 - Connecting and updating your Seneye USB device
Connect your seneye USB device (SUD) directly to the SWS. You will need to manually update the firmware in the SUD if a newer version is avalible.
Please note: if you have been using your SUD previously with a seneye connect PC application, your SUD will no longer communicate with the seneye connect on a PC after the firmware update (Until V2 SCA).
You must connect the SUD directly to the SWS and not use any form of extenstion leads as the SUD will not communicate correctly.
Once the SWS has detected that the firmware is out of date, it will put the SUD in boot load mode. You can tell that this has been completed because the 'seneye device connect light' on the SWS will be flashing.
Please disconnect and re-connect the SUD from the SWS.
The tile that is circled below will indicate that the firmware is downloading. The lights on the SWS will flash in a circle to indicated this.
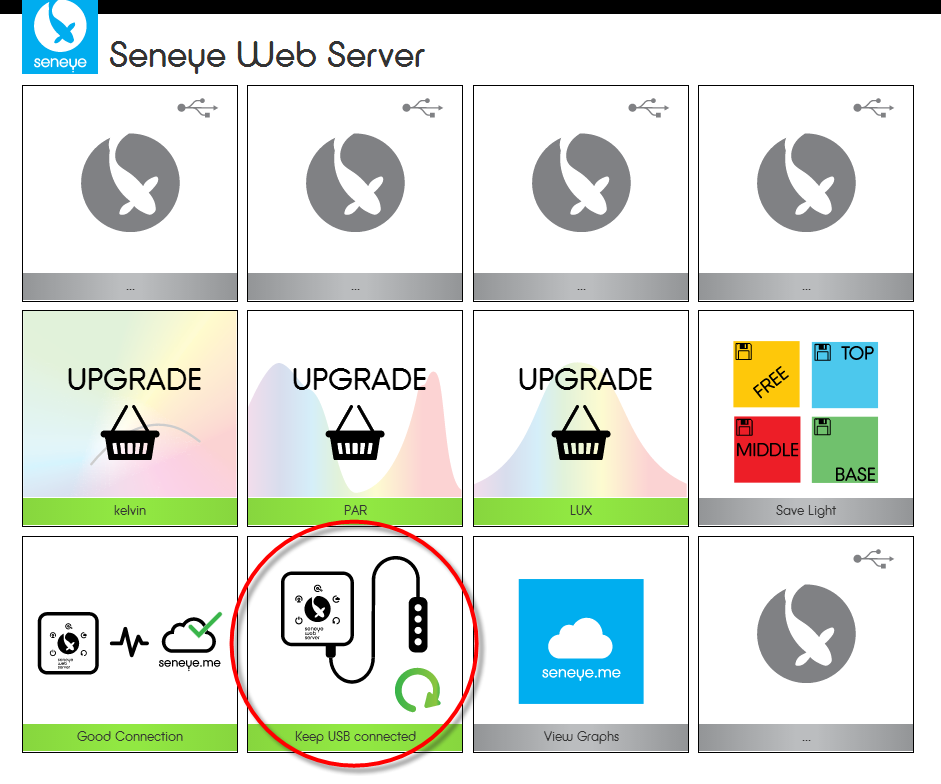
Do not disconnect your SUD from the SWS until the tile show the image below and the LEDs on the front of the SWS are still circling

Once the tile above is shows, and the lights have stopped circling, disconnect the SUD from the SWS and reconnect it to complete the update.
You will be able to see the update has been successful because the lights will illumiate. If the device is our of water, the lights on the front will flash as shown below:
Please do not forget to register your seneye slide
If you have any problems, please leave everything connected as it is and E-mail us at [email protected]
Setting up a WiFi module
Now that your SWS is registered to your account and your SUD is connected, you can set up any adaptors that you are using for the connection. If your SWS came with a WiFi adaptor module, please refer to the instructions that were included as to how to set this up (we recomend setting the WiFi plug up as a Wifi adaptor/WiFi Bridge).
The Edimax instructions are here.