SWS (Seneye Web Server) Instructions (English)
Table of contents
SENEYE BETA INSTRUCTIONS UPDATED 30 / 04 / 2014
DO NOT PLUG IN OR TURN ON YOUR SWS BEFORE READING THIS.
DO NOT CONNECT YOUR SENEYE DEVICE
For the beta we need to do two things; 1, ensure the firmware SWS is upto date and 2, update your seneye USB device to a V2 firmware. To do this you must not connect the seneye USB device.
Stage 1 - Updating the SWS.
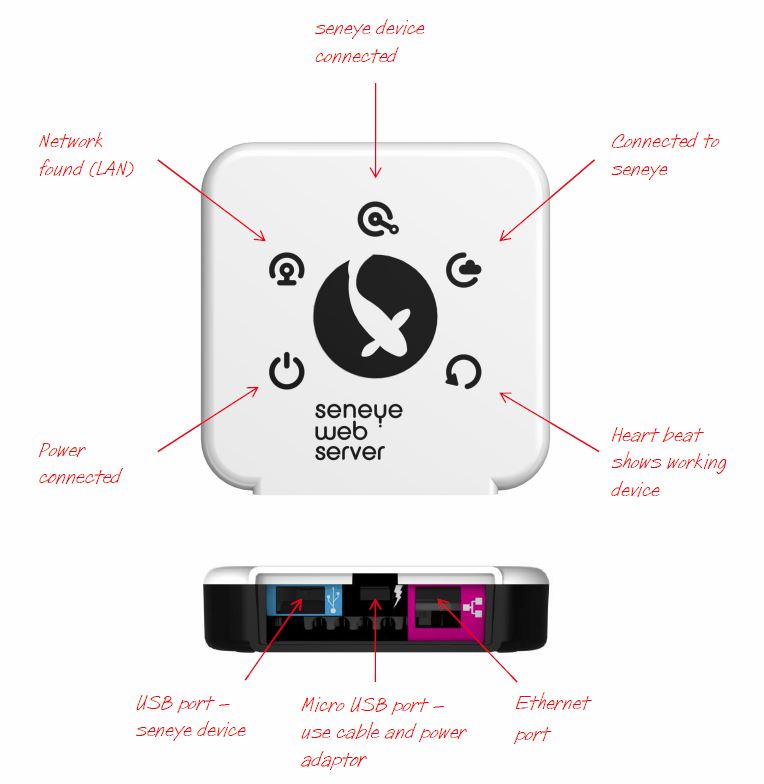
The SWS has the following ports which need connecting in the order described below.
We need to make sure the SWS firmware is up to update first.
A. CONNECT ETHERNET
a. Connect the Ethernet cable supplied directly to your router.
b. Connect the Ethernet cable to your SWS (purple port).
c. If you intend to use a recommended Wi-Fi or EOP module we suggest you do so after setup.

B. CONNECT POWER
a. Plug the USB power adaptor (supplied) into the mains.
b. Connect the micro USB cable (supplied) into USB power supply.
c. Connect the micro USB cable into the Micro USB port (black port).

Your SWS will then boot up:
When you SWS boots, the lights on the front will flash in the following sequence:
After this boot up the power light will stay on.
Stage Two - Confirming Connection to the cloud
You will need to check that your router has UPNP turned on or you will not get a complete connection. If you are unable to do this, can you please let us know the type of router you have, and we will find some instructions.
The SWS will now power up, obtain an IP address from your router, and connect with the servers. This will be confirmed with the following lights turning Green on the front of the device. It can take a few minutes for all of the lights to turn on so please be patient. If any of the lights do not turn on at all, please let us know via email at [email protected] and quote that you are stuck at 'Stage two' and the following lights are not on.

If a firmware update for the SWS is avalaible then it will start to down load it and the following light sequence will be shown.

Once downloaded it will show this light sequence while updating.
Please make sure that power and data lines are kept connected during this period. After an update it will return to the status shown in the image shown at the top of this section. You may occassionally see the SWS do this its self. Once out of beat would expect the frequency of updates to slow down.
Stage Three - Find the SWS Graphic User Interface.
The SWS has a Graphical User Interface (GUI) that will allow you to view data and interact with your SWS on your LAN (home network). You can access this by using an HTML5 web browser using any device on the same network. EG, a PC or tablet that is connected to the same router by Wi-Fi.
There are few different options as to how to find it and once found we suggest you book mark it on your browser.
A . Scan the small QR code .
The QR code that is on a sticker contains a link to the unique URL for your SWS page. There is also copy of this QR code inside the product. Later on we will show you how to unclip the SWS. If you scan this with a smart phone and copy and paste this into the web browser’s address bar it will find the SWS on your network. An example of the URL is on the link below, yours will look similar. Please note that some smart phone default to using a search engine rather than looking up the address and can result in the page not being found.The link will however work on a normal browser.

Example - http://sws2MOP534R4O6L
B. Find your SWS on your Network list .
You can use a PC (or other) to find your SWS on the network. On a PC this is achieved by opening ‘MY computer’ and clicking on the Network list on the left had side (1). This can take a few minutes to populate the list and sometimes you may need to press refresh (2). The SWS should show up under ‘other devices’, double clicking will open up the page using your default browser

C. Find the SWS IP address on your Browser.
Your router will give your SWS a unique IP address on your network. To find this out you will need to log onto the router using a web browser. Being as all routers are different there is no one set of instructions as to how to do this. The credentials as to how to do this are normally found on a sticker on the bottom or side of the router. As a general rule, this is how you do it.
1. Open your preferred web browser
2. Clear the URL address bar that is on the top
3. Type in 192.168.1.1* and press enter
*This is normally the default address for your router however some may be different. Checking the label on the back of the router should give the details.
4. You will then be prompted to enter a password, again this should be found on the label
5. The IP local addresses will either be linked under ‘Local Area Network’ (LAN) or DHCP list.
6. Find the one that has SWS as the start of the host name. For example SWSMOP534R4O6L
7. Copy the IP address (or example 192.168.1.10) and paste it into the URL bar of your browser
Please note that if your router assigns the SWS a different IP address, then you will have to use this method to find it again. This can occour if the router is rebooted for any reason.
If all of the above methods do not work ask us.
The SWS will upload the local IP address that your router has given it. If you can let us know the following details, we will be able to tell you.
Later on a SWS widget will be added to display all the information and a link to the SWS on your LAN.
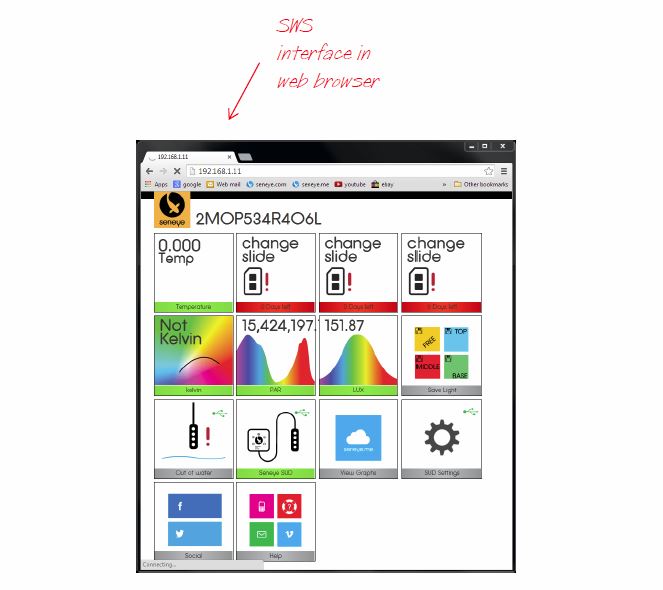
Stage four - The SWS GUI.
Once you have found the SWS you will find a page like that below. It will provide you with information like you see on the current SCA. The page is dynamic so you can move the widgets and it will also resize to any device screen size.
More widgets and functionality will be added over time through the automatic updates.
Your SWS is now working and you found it don't forget to book mark it!
Stage Five - Updating your Seneye USB device.
From the SWS interface you can update your seneye USB device (SUD).
You now need to connection your SUD in to the USB port on your SWS (blue port)
Once the SWS has detected that the firmware is out of date, it will start to download the latest version.
The tile that is circled below will indicate that the firmware is downloading.
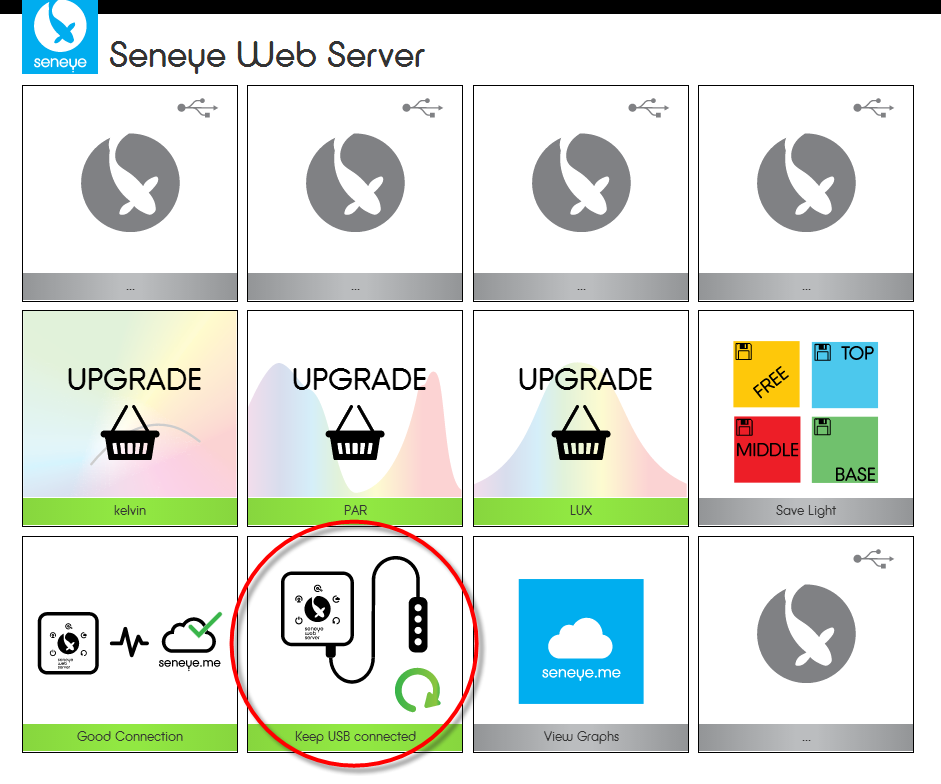
Do not disconnect your SUD untill the tile show the image below:

Once you have reconnected the SUD the top tiles (shown in grey) will change to information graphics and the front lights on the SUD will illumiate.
Your SUD firmware should be upgrade now and your SWS will be registered to your account. If you have any problems, please E-mail us.
Once updated and if out of water all the red lights will flash on your SUD.
This is normal and the new warning state for out of water.
Unclipping your SWS.
Remove all cables from the SWS.
If you ever need to unclip your SWS you will find two push in clips on the sides of the SWS. Both of these need to be simultaneously compressed to allow the top off.

Once the top is removed you will be able to see the inside.
The extra ports at the top are for later add- on (there is no fixed data on these yet but beta testers will be first to hear) .

SWS LED LIGHT SEQUENCES
Downloading an update:
If your SWS is downloading an update for itself or for your seneye device, the lights will flash in the following sequence:
Do not unplug your SWS if the device if your device is in this mode. When the update is complete, the light sequence will stop automatically.
Updating Firmware:
Your SWS will automatically update its own firmware if a newer version is avalible. If this happening then the lights will flash in the following sequence:
Do not unplug your SWS if the device if your device is in this mode. When the update is complete, the light sequence will stop automatically.
Bootload mode:
If your SWS shows the following lights on permanatly then it is in boot load mode.

This is highly unlikely, but easily rectified if you contact us.
If you see the sequence below then the device has no code and is bootload mode.
It is very unlikely you will ever see this however if it does happen please let us know.
SUD V2 (beta) LED LIGHT SEQUENCES
Taking reading or communicating (power on).

Reading taken and alert switching on (temperature - all behave the same).

Alert on for temperature and a reading being taken.
Out of water!
Seneye Dri
If you are keeping your seneye outside or in a very wet area then we would recommend placing all the connections in a seneye Dri. Water or high humidity will damage your SWS.